To obtain a module from the CVS server for the first time is known as a checkout. Checking a module out from the repository creates a local sandbox of the module.
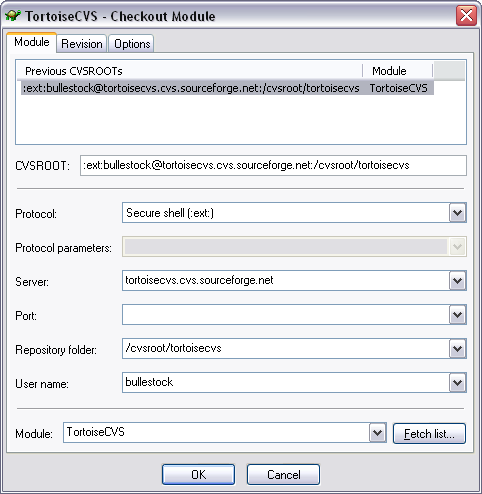
To perform a checkout, Right-click on the folder where you would like the module placed, and pick from the pop-up menu. The Checkout Dialog will appear with the following fields:
Protocol The protocol to use when communicating to the remote CVS repository.
Protocol parameters This field is only enabled for certain protocols, currently
:sserver:and:sspi:. With certain combinations of different CVS client and server versions, or with restrictive firewalls, it may be necessary to enter additional information here in order to be able to connect to the CVS server. Your CVS server administrator will know whether this is necessary.Note that for the
:ext:protocol it is not possible to specify additional parameters here; this is a technical limitation due to the way that:ext:is designed. Instead, those parameters can be set in the Preferences dialog, on the Tools tab.Server The name of the server hosting the remote CVS repository.
Port The port for the remote CVS repository. Not usually required.
Repository Directory The location of the CVS repository on the remote server.
User name The username of your account for the CVS repository.
CVSROOT The full connection string, comprised of the above fields. Often you will be given the connection string in this format, in which can just paste it in here.
Module The name of the module you want to checkout. The module name is case sensitive.
You will need to know this information in advance. Most projects should have some documentation (often online) on how to connect and checkout their modules. Additionally, your software lead, or project manager should be able to provide this information to you.
An exception to this is the module name - depending on how your CVS server is setup, you might find the module name in the dropdown after clicking Fetch list... (for details, see How 'Fetch list...' finds the list of modules).
Note: It is much easier to choose your project checkout settings now than it is to move your project to a different server or protocol later. For example, if your server offers two different CVS protocols, make sure you pick the one that best suits your needs.
A folder named after the module will be created within the folder you checkout to, so you can keep all your checked out modules in the same folder, even if they are for different projects.
For more information see Obtaining a Working Copy: CVS Checkout....