Auto ThickBox Plus
※ 上の画像をクリックすると ThickBox のポップアップ動作が一目で分かります。
目次
概要
Auto ThickBox Plus は Web サイトに ThickBox スクリプトを自動的に適用する WordPress プラグイン。ThickBox は多くのサイトで使われている Lightbox ライクなプラグインで、リンク先の画像やインライン、iFrame、AJAX コンテンツをシンプルな効果でページ上にポップアップ表示することができる。
基本機能
- ThickBox スクリプトがサムネイル画像 (WordPress ギャラリー含む) に自動的に適用される
- WordPress ギャラリーに画像をアップロードするか画像リンクを伴う画像 (
<a href="image"><img /></a>) を記述するだけで OK
- WordPress ギャラリーに画像をアップロードするか画像リンクを伴う画像 (
- Lightbox, ColorBox, FancyBox, Shadowbox, Slimbox などと比較するとポップアップ効果がシンプルで動作が軽快
- ThickBox はアニメーション効果や装飾的なデザインを好まない人に最適
- ブラウザーウィンドウより大きな画像は自動的にリサイズされる
- WordPress 標準搭載の ThickBox ライブラリを使用 (スクリプトのインストールや参照が不要)
追加機能
- ポップアップ画像をスライド表示 (Gallery Images) または個別表示 (Single Image) スタイルで表示
- 画像リンクを伴うテキスト (
<a href="image">text</a>) にも自動的に ThickBox を適用 - 画像の自動リサイズ機能を無効にすることもできる
- ThickBox ウィンドウをマウスドラッグによって移動/リサイズできる
- プラグインの挙動やデザインを 60 以上のオプションによってカスタマイズできる
- BMP, WebP 画像形式もサポート
- ページ上のインラインコンテンツをサポート (#TB_inline)
- AJAX コンテンツをサポート (同じドメイン上のファイルを iframe を使わずにページ上に表示)
- 旧バージョンの WordPress 2.7 までの幅広い互換性
- WordPress 3.2/3.3 のデフォルトテーマ (Twenty Eleven) との互換性
- W3 Total Cache や Head Cleaner などのキャッシュプラグインとの互換性
- 改良版 ThickBox は NextGEN Gallery などのほかの ThickBox プラグインでも有効
- WordPress の翻訳を使用
- ThickBox ウィンドウは 70 以上の言語にローカライズされる (アラビア語、中国語、オランダ語、フランス語、ドイツ語、ヒンディー語、イタリア語、日本語、韓国語、ポーランド語、ポルトガル語、ロシア語、スペイン語など)
- Auto ThickBox プラグインや WordPress 付属の ThickBox にある多数のバグを修正 (更新履歴参照)
ダウンロード
- auto-thickbox-plus.zip
-
- v1.9, 2012-10-11, 925 KB
- 無料ライセンス (個人かつ非営利、寄付歓迎)
- auto-thickbox-plus.zip
-
- v1.9, 2012-10-11, 925 KB
- 商用ライセンス (500 円)
- 有償サポート (技術的な質問やカスタマイズなど)
対応ブラウザー
- Internet Explorer
- Mozilla Firefox
- Google Chrome
- Opera
- Safari
更新履歴
- version 1.9
- version 1.8
- version 1.7
- version 1.6
- version 1.5
- version 1.4
- version 1.3
- version 1.2
- version 1.1
- version 1.0
- version 0.9
- version 0.8
- version 0.7
- version 0.6
- version 0.5
- version 0.4
- version 0.3
- version 0.2
- version 0.1
- Auto ThickBox Single (Auto ThickBox Plus の前身)
インストール
自動インストール
- WordPress のダッシュボードにアクセスする
- [プラグイン] – [新規追加] を選択
- テキストフィールドに “thickbox” と入力して [プラグインの検索] をクリック
- 「Auto ThickBox Plus」の「今すぐインストール」をクリック
- 「プラグインを有効化」をクリック
- WordPress ギャラリーに画像をアップロード、または画像やほかのページへのリンクを記述する
手動インストール
- auto-thickbox-plus.zip をダウンロードする
- WordPress のダッシュボードにアクセスする
- [プラグイン] – [新規追加] – 「アップロード」タブを選択
- ダウンロードした ZIP ファイルをアップロードして [今すぐインストール] をクリック
- 「プラグインを有効化」をクリック
- WordPress ギャラリーに画像をアップロード、または画像やほかのページへのリンクを記述する
手動インストール (FTP)
- auto-thickbox-plus.zip をダウンロードして解凍する
- 生成されたプラグインフォルダーを
wp-content/plugins/ディレクトリーにアップロードする - WordPress の [プラグイン] メニューからプラグインを有効化する
- WordPress ギャラリーに画像をアップロード、または画像やほかのページへのリンクを記述する
※ 注:オリジナルの Auto Thickbox プラグインがインストールされている場合は、Auto ThickBox Plus プラグインを有効化する前に停止またはアンインストールしておく。Auto ThickBox Plus プラグインとオリジナルのプラグインを同時に有効化することはできない。
デモ
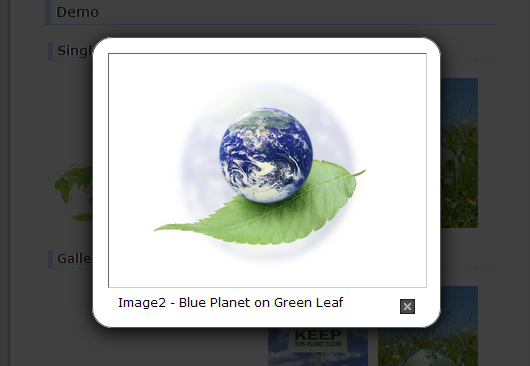
個別表示 (Single Image)


スライド表示 (Gallery Images)
ポップアップ表示無効 (No ThickBox)
画像へのテキストリンク
- 個別表示
-
Image1,
Image2,
Image3,
Image4 - スライド表示
-
Image1,
Image2,
Image3,
Image4 - ポップアップ表示無効
-
Image1,
Image2,
Image3,
Image4
使い方
※ Usage (英語) は最新バージョンに追従していますが、日本語の説明は多少古くなってます。
Single Image (個別表示)
画像ファイルへの画像リンクを記述すると、リンク先の画像が現在表示されているページ上にポップアップ表示される。
<a href="image.png">
    <img src="image_s.png" alt="Sample Image" />
</a>
また画像ファイルへのテキストリンクを記述すると、同様にリンク先の画像がポップアップ表示される。
<a href="image.png" title="Sample Image">Link Text</a>
※ img 要素の alt 属性に記述していた画像の説明は、代わりに a 要素の title 属性で指定する。
Gallery Images (スライド表示)
画像をスライド表示 (Gallery Images) スタイルで表示したい場合は、a 要素の rel 属性に共通の値を指定する。(a@rel=”foo”)
<a href="image1.png" rel="foo">
    <img src="image1_s.png" alt="Image1" />
</a>
<a href="image2.png" rel="foo">
    <img src="image2_s.png" alt="Image2" />
</a>
ポップアップ表示無効
画像のポップアップ表示を無効にしたい場合は、a 要素の class 属性に “nothickbox” を指定する。(a@class=”nothickbox”)
<a href="image.png" class="nothickbox">
    <img src="image_s.png" alt="Sample Image" />
</a>
画像以外へのリンクの ThickBox 適用
画像以外へのリンク (iframe など) に ThickBox を適用したい場合は、a 要素の class 属性に “thickbox” を指定する。(a@class=”thickbox”)
<a href="iframe.html" class="thickbox" title="Sample Page">
    Any links to non-image
</a>
FAQ
※ FAQ (英語) は最新バージョンに追従していますが、日本語の説明は多少古くなってます。
Auto ThickBox Plus の設定ページにアクセスするには?
- WordPress のダッシュボードにアクセスする
- サイドバーの [設定] – [Auto ThickBox Plus] をクリック
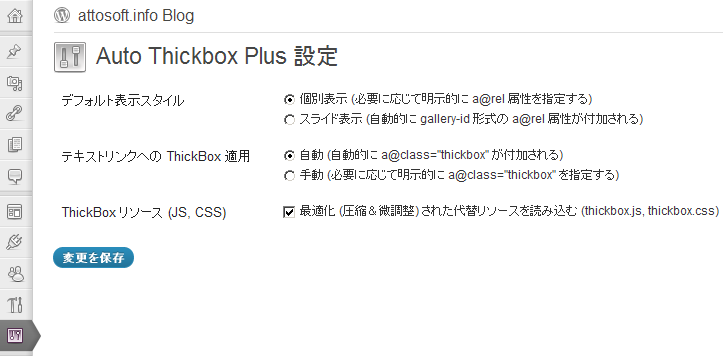
デフォルトではスライド表示スタイルで画像をポップアップ表示したい
- [Auto ThickBox Plus 設定] ページを開く
- [デフォルト表示スタイル] – [スライド表示] を選択
- [変更を保存] ボタンをクリック
デフォルトではリンクテキストに ThickBox を適用したくない
- [Auto ThickBox Plus 設定] ページを開く
- [テキストリンクへの ThickBox 適用] – [手動] を選択
- [変更を保存] ボタンをクリック
オリジナルの ThickBox リソース (JS, CSS) を使いたい
- [Auto ThickBox Plus 設定] ページを開く
- [ThickBox リソース (JS, CSS)] – [最適化 (圧縮&微調整) された代替リソースを読み込む (thickbox.js, thickbox.css)] のチェックをはずす
- [変更を保存] ボタンをクリック
サポートする
- モチベーションを保つため、プラグインページから評価スターや互換性情報 (Works/Broken) の報告をお願いします
- 質問がある人はサポートフォーラムをチェックするか新しい質問を投稿してください
- ほかの言語に翻訳できる人は Localization を参照ください。あるいは連絡いただければ丁寧に説明します。おかしな英語に気付いた人も連絡ください。
- プラグイン開発を支援するために寄付をしていただけるととても嬉しいです
- 何かフィードバックなどあればコンタクトページからお問い合わせください
いただいたコメントは大変参考になります。ここまで読んでいただきありがとうございました。
スペシャルサンクス
- オランダ語 (nl_NL) 翻訳ファイル – Michel Bats
- フランス語 (fr_FR) 翻訳ファイル – Jean-Bastien Prevots
- イタリア語 (it_IT) 翻訳ファイル – Gianni Diurno
- ペルシア語 (fa_IR) 翻訳ファイル – Mohammadi
- スペイン語 (es_ES) 翻訳ファイル – Juan Antonio Peon
- スウェーデン語 (sv_SE) 翻訳ファイル – Lukas Hausler
- スクリーンショット中のボタン画像 – Lukas Hausler
- バグ修正コード – Olivier Burgard
[…] Auto Thickbox Plus Plugin Official Site [Japanese] […]
“Auto Thickbox Plus”利用させていただきました。
いろいろあって悩んだのですがテキストリンク対応が便利そうだったのでこれを選びました。
ありがとう。
コメントありがとうございます。
ほかのポップアップ系のプラグインと比べると多機能ではありませんが、シンプルに使うには十分便利な機能が小さくまとまっていると思います。
[…] Auto Thickbox Plus 公式サイト […]
Can I customize width and height ?
ThickBox script will calculate the size of popup window based on image size.
So if you want to customize image size, I think you need to modify thickbox.js.
If you want to resize image size to half, for example, write the following code at about line 133 in thickbox.js (thickbox_uncompressed.js).
Thanks
[…] WordPress: シンプルな効果で画像をポップアップ表示する Auto ThickBox Plus プラグイン | attosoft.info Blog […]
Can I iframe customize width and height ?
Yes, you can. Here are the sample URLs to specify iframe parameters.
iframe.html?TB_iframe=true&width=600&height=400http://example.com/?foo=bar&TB_iframe=truemodal.html?TB_iframe=true&modal=true[…] you like this plugin, please consider making a donation to support plugin […]
Hey,
It seems the following bug still persists in jQuery 1.7.1. From your code thickbox.js line 896-902:
// XXX: On display:none, width/innerWidth/outerWidth() returns 0, outerWidth(true) returns only margin in v1.4.4 or earlier
// XXX: On display:none, innerWidth/outerWidth() returns width(), outerWidth(true) returns only margin in v1.6.2 or earlier
if (jQuery("#TB_window").css("display") == "none" &&
	(tb_versionCompare('1.4.4') > 0 || (tb_versionCompare('1.6.2') > 0 && include)))
	jQuery.swap(jQuery("#TB_window")[0], {position: "absolute", visibility: "hidden", display: "block"}, setter);
else
	setter();
Have to make it satisfy the first condition in order to make your plugin work.
Please have a look. Thanks!
-Guan
Hi Guan, Thanks for your comment.
Generally it is no need to call jQuery.swap() in getting width/height. But jQuery has width/height bugs in v1.4.3 (or earlier) and v1.6.1 (or earlier). So the code above calls jQuery.swap() for a workaround. For details, see release notes below.
I checked your site. Your site loads jQuery v1.4.2 and v1.7.1. I’m not sure for now but I think this is the cause.
Hello ^^
can u change the border color of the pictures?
Coz i have been look but i cannot find the setting od this? :/
photo
http://i304.photobucket.com/albums/nn179/princessgirlbunny/Captura-de-pantalla-2012-05-18-a-las-0912.jpg
Hi kami,
You can customize image/window borders by using Border option. Border option syntax is “border-width border-style border-color”. So #666 and #ccc is border-color. For details, see border description in MDN (Spanish).
I am sorry for my ignorance, i dont understand this ^^;
I have to check that in my theme layout or in ur plugin where says EDIT and i can see the php and CSS ??.
Thank u :)
Sorry for my bad English. You can change the border color through Options page.
So sorry, i though was from ur plugin thats why i asked to you, i found the reply, i had to go to my worpress/content – media php…
thank u so much for ur time anyway :)
media.php!? Oh I understand what you say finally. I’m talking about Auto ThickBox Plugin but you are talking about just WordPress Gallery. You seem to try to change the border color of thumbnails in WordPress Gallery. So you need to overwrite the following CSS rule written in media.php.
#gallery-1 img { border: 2px solid #CFCFCF; }Hello
please help me
Buttons prev & next On images not work
What do I need?
Thanks
Hi Mohammadi,
Thank you for using Auto ThickBox Plus.
I found the following style in nggallery.css at your site.
#TB_window {
	z-index: 9999 !important;
}
By this code Background area has been in front of ThickBox window because background z-index is 10100. As a result, all you can do is click background to click ThickBox window, and prev/next images and links don’t work. I guess you edited nggallery.css through “Dashboard – Gallery – Style” option of NextGEN Gallery. you need to remove the code.
Additionally, I recommend you set more than 5% value at “Action – Mouse Click – Clickable Range” option, and set the following style because you use larger custom images.
#TB_closeWindow { margin-top: -2px; padding-top: 0; }Thank you very much
My problem was solved.
I am very interested by payment money in developing this plugin can help you. But Unfortunately, global banks are banned in Iran.
I have one more question.
when open the site not completed When click on the images not load Auto ThickBox Plus and go to link image
give me a Solution how can I open the images by Auto ThickBox Plus before uncompleted load site?
Thanks
Thanks for your concern about donation. I wish you could but it’s OK. I’d be grateful if you support me by the followings instead.
It’s a difficult issue and may be said as one of HTML/JavaScript specifications. You can improve the situation by optimizing Web site – reducing site size, changing order of loading JavaScript, and so on.
Hi attosoft,
i have a strange problem. Go to lnx.egosoundfactory.it, i have in homepage, a multi-image portfolio. I downloaded Auto ThickBox Plus, and istalled it. When i active the plugin, the multi-image portfolio on the homepage, doesn’t work!!! If i deactive the plugin, back to works!!!
Could you help me?
Thanks
Hi Ivan,
Thank you for your interest in Auto ThickBox Plus.
I accessed you site but couldn’t find any problems for now. How does the plugin not work? I need more information such as JavaScript errors and PHP errors.
hey,i am using your plugin and it works well,i love it deeply.But i found that when i click on a image which has a large size, i cannot see it clearly. so i want to know can you add a function that can show a picture in it’s actual size mode, you can reference this page:http://www.linuxdeepin.com/forum/18/7302
Hi iwobz,
Thank you for using Auto ThickBox Plus. If you are using the latest version, you’ll see the following options for image size.
In addition, I intend to add “Expand/Shrink button” option to the plugin in next release.
yes, my blog runs version 1.7 currenly, i do see those settings except Expant/Shrink, expect your new vertion!
You can see “Expand/Shrink” option by reinstalling the plugin. See Changelog for details.
Does this work with an image map?
Hi richard, I’m sorry for the late reply.
Yes, ThickBox supports image maps.